Battery switch on travel trailer function is crucial for managing your RV’s power. Understanding how to use it safely and efficiently is key to preventing dead batteries and electrical issues. This guide covers different battery switch types, safe connection/disconnection procedures, troubleshooting tips, and maintenance best practices, ensuring you’re ready for any situation on the road.
We’ll explore the various types of switches, from simple on/off to more complex systems that allow you to select between different batteries or combine their power. We’ll also delve into the importance of proper grounding and how to avoid common problems like corroded connections or blown fuses. By the end, you’ll be confident in managing your travel trailer’s battery system.
Understanding Battery Switch Functionality in Travel Trailers

Your travel trailer’s battery switch is a crucial component, acting as the central control for your trailer’s battery power. It allows you to isolate and manage the flow of electricity from your trailer batteries, protecting your appliances and preventing unwanted drain. Understanding how it works is key to maintaining your trailer’s electrical system and avoiding costly repairs.
So, you’re planning a trip? Awesome! First things first: get yourself sorted with travel insurance. Check out Aon travel insurance for comprehensive coverage. Then, if you’re an audiophile like me, don’t forget your tunes! Planning your audiophile travel setup beforehand is key for a truly enjoyable trip. Make sure you pack your favorite headphones and a portable DAC for top-notch sound quality on the go.
Happy travels!
Battery Switch Types and Their Purpose
Battery switches in travel trailers primarily serve to disconnect your house batteries from the trailer’s electrical system. This is essential for preventing battery drain when the trailer is stored for extended periods, or to isolate a faulty battery. The most common types are the 1-2-both-off and the simpler 1-2-off switches. The 1-2-both-off switch allows you to select either battery 1, battery 2, both batteries, or to completely disconnect both.
The 1-2-off switch only allows you to select either battery 1 or battery 2, or to turn both off. Choosing the right type depends on your setup and needs; dual battery setups benefit greatly from the 1-2-both-off option.
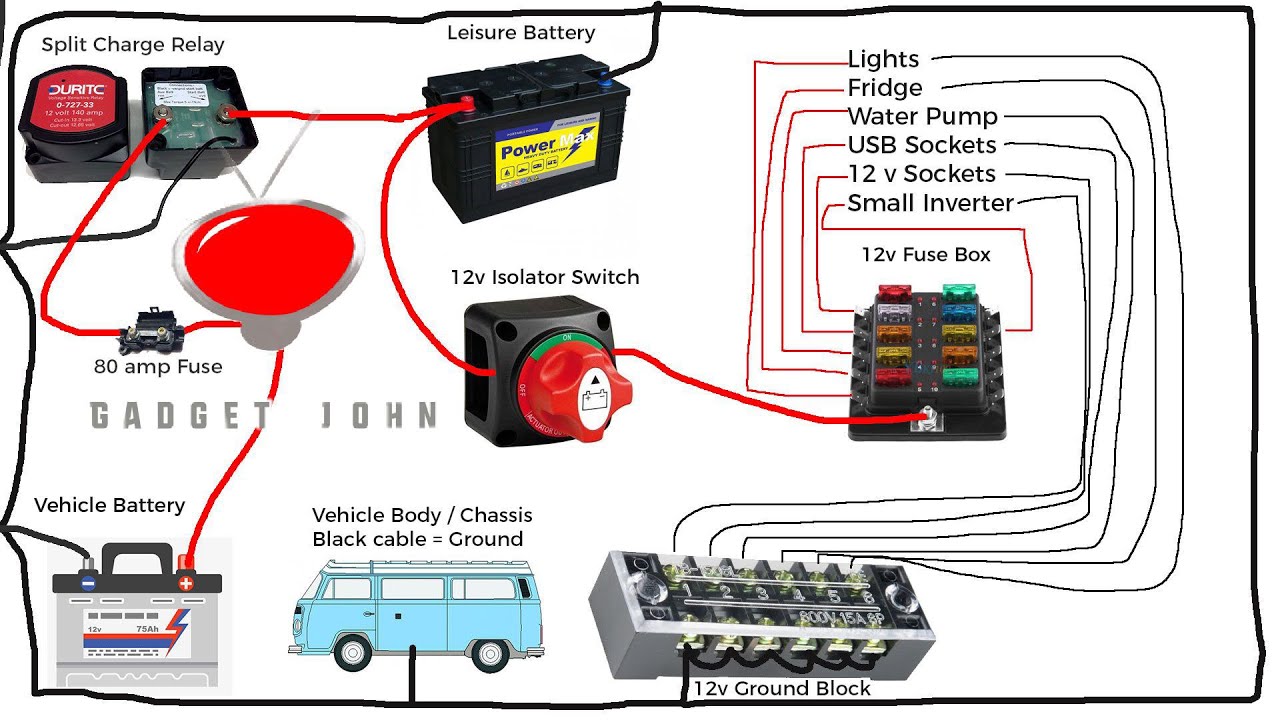
Typical Battery Switch Wiring Diagram
A typical battery switch setup involves two batteries connected to the switch, which then connects to the trailer’s 12-volt electrical system. Imagine a simple diagram: two batteries (Battery 1 and Battery 2) each have a positive (+) and negative (-) terminal. These terminals are connected to the input terminals of the battery switch. The switch itself has output terminals (+ and -) that connect to the positive and negative buses of your trailer’s 12-volt system.
This system allows the switch to control which battery (or both) powers the trailer. Properly sized wiring and fuses are essential for safety. Incorrect wiring can lead to short circuits or damage to your electrical components.
So, you’re planning a trip? Awesome! First things first: get yourself sorted with travel insurance. Check out Aon travel insurance for solid coverage. Then, think about your in-flight entertainment. If you’re an audiophile, you’ll want a killer audiophile travel setup to make those long flights a breeze.
Don’t forget noise-cancelling headphones!
Comparison of Battery Switch Types
| Feature | 1-2-Both-Off Switch | 1-2-Off Switch |
|---|---|---|
| Number of Positions | Four (1, 2, Both, Off) | Three (1, 2, Off) |
| Flexibility | High; allows independent or combined battery use | Moderate; allows selection of one battery or both off |
| Cost | Generally slightly more expensive | Generally less expensive |
| Suitability | Ideal for dual battery systems, maximizing battery life and providing redundancy. | Suitable for single battery systems or where simpler operation is preferred. |
Battery Switch and its Role in Energy Management: Battery Switch On Travel Trailer Function
The battery switch is your travel trailer’s central command for power distribution, acting as a gatekeeper between your house batteries and the various appliances and systems. Understanding its function is key to extending the life of your batteries and ensuring you have power when you need it. Proper use of the switch significantly impacts your energy efficiency and prevents unexpected power outages.Efficient energy management in a travel trailer relies heavily on understanding and using the battery switch correctly.
The switch allows you to isolate your house batteries from the rest of the system, preventing unwanted drain when the trailer is stored or not in use. It also enables you to selectively power different circuits, prioritizing essential systems when your battery level is low. This targeted approach prevents complete battery drain and extends the lifespan of your batteries, saving you money on replacements.
Battery Switch Operation for Maximized Battery Life
To maximize battery life and prevent premature drain, always turn off the battery switch when your travel trailer is not in use for extended periods. This isolates your house batteries, preventing parasitic drain from low-power devices like clocks or smoke detectors. When you’re camping, strategically use the switch to power only necessary appliances. For example, if you’re only using the lights and refrigerator, turn off circuits for the air conditioner and water heater to conserve power.
Regularly check your battery voltage to ensure they are charging adequately and not experiencing excessive drain.
Energy Consumption Comparison: House Battery vs. Chassis Battery
The house batteries in your travel trailer typically power interior appliances like lights, refrigerators, and air conditioners. These batteries are generally deep-cycle batteries designed for consistent discharge and recharge. The chassis battery, on the other hand, powers the starting system of your tow vehicle’s engine and other vehicle-specific functions. It’s usually a starting battery designed for short bursts of high power.
Comparing energy consumption, a 1500-watt air conditioner running off the house batteries will drain them much faster than a small LED light. The chassis battery, while capable of providing significant power for engine starting, is not designed for prolonged use powering house appliances. Attempting to power a significant load like an air conditioner from the chassis battery could quickly drain it and leave you stranded.
Impact of Battery Switch Positions on Power Consumption: A Hypothetical Scenario
Let’s imagine you’re at a campsite with limited sunlight for solar charging. Your travel trailer has a 12V refrigerator (drawing 5 amps), LED interior lights (drawing 1 amp), and a 1500-watt air conditioner (drawing 125 amps). With the battery switch in the “on” position and all appliances running, your total draw is approximately 131 amps. This will rapidly drain your batteries.
If you turn off the air conditioner using a circuit breaker and only use the refrigerator and lights, your draw is reduced to 6 amps, significantly extending battery life. Switching the battery switch to “off” when leaving the trailer for the day completely stops the drain from all house-battery powered appliances, except perhaps a small parasitic load from a security system.
This scenario demonstrates the significant impact of the battery switch on overall power consumption and emphasizes the importance of selective appliance use.
Illustrating Battery Switch Operation
Let’s get a clearer picture of how these battery switches work, both visually and internally. Understanding their operation is key to safely managing your travel trailer’s power.A typical battery switch is a fairly robust piece of equipment, usually made of metal and designed to withstand vibrations and outdoor conditions. It’s typically mounted in a readily accessible location, often near the batteries themselves or within a convenient compartment in your trailer.
You’ll see several thick cables connected to it, usually with clearly labeled terminals. These terminals connect to your trailer batteries (typically two), and your shore power connection. The switch itself will have a clearly marked handle or lever, and often a series of clearly labeled positions.
Battery Switch Physical Appearance and Connections, Battery switch on travel trailer function
The switch itself is usually a rectangular or square box, often made of heavy-duty plastic or metal. You’ll see several large, clearly marked terminals for connecting the positive (+) cables from your batteries and your shore power input. These terminals are often color-coded (red for positive, black for negative) for safety. The negative (-) cables are typically connected directly to the battery and chassis, bypassing the switch for safety reasons (to prevent accidental short circuits).
The switch body itself usually has a label indicating the manufacturer and any relevant model numbers.
Internal Workings of a Battery Switch
Inside the switch, the magic happens with a series of heavy-duty contacts and switches. When you move the switch handle, it mechanically moves these internal contacts, creating or breaking electrical connections. In the “OFF” position, all connections are broken, preventing any current flow. In the “BATTERY 1” position, the switch connects only the first battery to the trailer’s electrical system.
“BATTERY 2” does the same for the second battery. And finally, “BOTH” connects both batteries in parallel, providing double the power. This internal mechanism is usually sealed to protect it from the elements.
Battery Switch Position Indicators
Imagine a circular dial or a lever with clearly marked positions. The dial or lever itself would show the selected power source. Each position would be clearly labeled:* OFF: This position completely disconnects both batteries from the trailer’s electrical system. This is the crucial safety position when not using the trailer for extended periods.* BATTERY 1: This position connects only the first battery to the trailer’s electrical system.
This is useful for extending battery life, especially if one battery is newer or healthier than the other.* BATTERY 2: Similar to “BATTERY 1,” this connects only the second battery to the trailer’s electrical system. This allows for similar life extension of a healthier battery.* BOTH: This position connects both batteries in parallel to the trailer’s electrical system.
This provides the maximum available power output, ideal for running high-demand appliances.
Mastering your travel trailer’s battery switch is about more than just turning power on and off; it’s about understanding your RV’s electrical system and maximizing its efficiency and longevity. By following the safety guidelines, troubleshooting tips, and maintenance advice Artikeld here, you can ensure a smooth and enjoyable camping experience, free from electrical headaches. So, get out there and enjoy the open road!
Commonly Asked Questions
What happens if I leave my battery switch in the “BOTH” position?
Leaving the switch in “BOTH” constantly can drain your batteries faster, especially if you have parasitic draws (devices using power even when turned off). It’s best to switch to “OFF” when not using the trailer for extended periods.
How often should I clean my battery terminals?
Ideally, clean your battery terminals every 3-6 months, or more often if you notice corrosion. Regular cleaning prevents poor connections and ensures optimal battery performance.
My battery switch is not working. What should I check first?
First, check the fuses both in the switch itself and in your trailer’s fuse panel. Next, visually inspect the wiring for any damage or loose connections. Finally, test the batteries themselves to ensure they’re not dead.
Can I use a different type of battery switch than what came with my trailer?
While possible, it’s crucial to ensure the replacement switch has the correct amperage rating and wiring configuration for your system. Incorrectly installing a switch could damage your batteries or even cause a fire. Consult a qualified electrician if you’re unsure.
